Yesterday, we released an
update to PhotoScan, an app for
iOS and
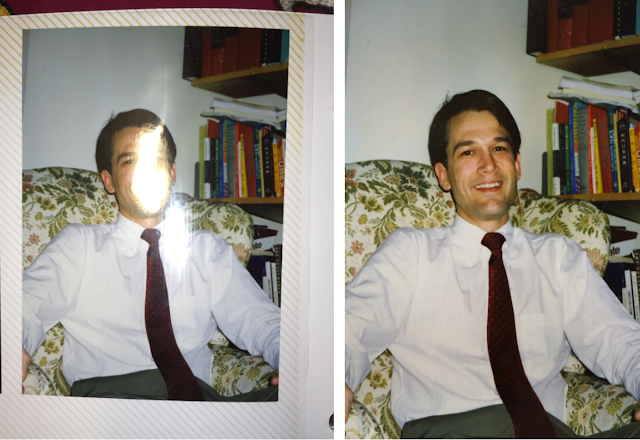
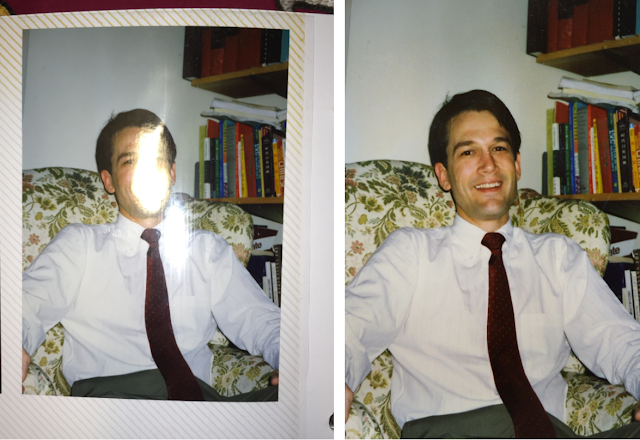
Android that allows you to digitize photo prints with just a smartphone. One of the key features of PhotoScan is the ability to remove glare from prints, which are often glossy and reflective, as are the plastic album pages or glass-covered picture frames that host them. To create this feature, we developed a unique blend of computer vision and image processing techniques that can carefully align and combine several slightly different pictures of a print to separate the glare from the image underneath.
 |
| Left: A regular digital picture of a physical print. Right: Glare-free digital output from PhotoScan |
When taking a single picture of a photo, determining which regions of the picture are the actual photo and which regions are glare is challenging to do automatically. Moreover, the glare may often saturate regions in the picture, rendering it impossible to see or recover the parts of the photo underneath it. But if we take several pictures of the photo while moving the camera, the position of the glare tends to change, covering different regions of the photo. In most cases we found that every pixel of the photo is likely not to be covered by glare in at least one of the pictures. While no single view may be glare-free, we can combine multiple pictures of the printed photo taken at different angles to remove the glare. The challenge is that the images need to be aligned very accurately in order to combine them properly, and this processing needs to run very quickly on the phone to provide a near instant experience.
 |
| Left: The captured, input images (5 in total). Right: If we stabilize the images on the photo, we can see just the glare moving, covering different parts of the photo. Notice no single image is glare-free. |
Our technique is inspired by our earlier work published at
SIGGRAPH 2015, which we dubbed “
obstruction-free photography”. It uses similar principles to remove various types of obstructions from the field of view. However, the algorithm we originally proposed was based on a generative model where the motion and appearance of both the main scene and the obstruction layer are estimated. While that model is quite powerful and can remove a variety of obstructions, it is too computationally expensive to be run on smartphones. We therefore developed a simpler model that treats glare as an outlier, and only attempts to register the underlying, glare-free photo. While this model is simpler, the task is still quite challenging as the registration needs to be highly accurate and robust.
How it WorksWe start from a series of pictures of the print taken by the user while moving the camera. The first picture - the “reference frame” - defines the desired output viewpoint. The user is then instructed to take four additional frames. In each additional frame, we detect
sparse feature points (we compute
ORB features on
Harris corners) and use them to establish
homographies mapping each frame to the reference frame.
 |
| Left: Detected feature matches between the reference frame and each other frame (left), and the warped frames according to the estimated homographies (right). |
While the technique may sound straightforward, there is a catch - homographies are only able to align flat images. But printed photos are often not entirely flat (as is the case with the example shown above). Therefore, we use
optical flow — a fundamental, computer vision representation for motion, which establishes pixel-wise mapping between two images — to correct the non-planarities. We start from the homography-aligned frames, and compute “flow fields” to warp the images and further refine the registration. In the example below, notice how the corners of the photo on the left slightly “move” after registering the frames using only homographies. The right hand side shows how the photo is better aligned after refining the registration using optical flow.
 |
| Comparison between the warped frames using homographies (left) and after the additional warp refinement using optical flow (right). |
The difference in the registration is subtle, but has a big impact on the end result. Notice how small misalignments manifest themselves as duplicated image structures in the result, and how these artifacts are alleviated with the additional flow refinement.
 |
| Comparison between the glare removal result with (right) and without (left) optical flow refinement. In the result using homographies only (left), notice artifacts around the eye, nose and teeth of the person, and duplicated stems and flower petals on the fabric. |
Here too, the challenge was to make optical flow, a naturally slow algorithm, work very quickly on the phone. Instead of computing optical flow at each pixel as done traditionally (the number of flow vectors computed is equal to the number of input pixels), we represent a flow field by a smaller number of control points, and express the motion at each pixel in the image as a function of the motion at the control points. Specifically, we divide each image into tiled, non-overlapping cells to form a coarse grid, and represent the flow of a pixel in a cell as the
bilinear combination of the flow at the four corners of the cell that contains it.
 |
| The grid setup for grid optical flow. A point p is represented as the bilinear interpolation of the four corner points of the cell that encapsulates it. |
 |
| Left: Illustration of the computed flow field on one of the frames. Right: The flow color coding: orientation and magnitude represented by hue and saturation, respectively. |
This results in a much smaller problem to solve, since the number of flow vectors to compute now equals the number of grid points, which is typically much smaller than the number of pixels. This process is similar in nature to the spline-based image registration described in
Szeliski and Coughlan (1997). With this algorithm, we were able to reduce the optical flow computation time by a factor of ~40 on a Pixel phone!
 |
| Flipping between the homography-registered frame and the flow-refined warped frame (using the above flow field), superimposed on the (clean) reference frame, shows how the computed flow field “snaps” image parts to their corresponding parts in the reference frame, improving the registration. |
Finally, in order to compose the glare-free output, for any given location in the registered frames, we examine the pixel values, and use a soft minimum algorithm to obtain the darkest observed value. More specifically, we compute the expectation of the minimum brightness over the registered frames, assigning less weight to pixels close to the (warped) image boundaries. We use this method rather than computing the minimum directly across the frames due to the fact that corresponding pixels at each frame may have slightly different brightness. Therefore, per-pixel minimum can produce visible seams due to sudden intensity changes at boundaries between overlaid images.
 |
| Regular minimum (left) versus soft minimum (right) over the registered frames. |
The algorithm can support a variety of scanning conditions — matte and gloss prints, photos inside or outside albums, magazine covers.
| Input Registered Glare-free |
|
 |
 |
To get the final result, the Photos team has developed a method that automatically detects and crops the photo area, and rectifies it to a frontal view. Because of perspective distortion, the scanned rectangular photo usually appears to be a quadrangle on the image. The method analyzes image signals, like color and edges, to figure out the exact boundary of the original photo on the scanned image, then applies a geometric transformation to rectify the quadrangle area back to its original rectangular shape yielding high-quality, glare-free digital version of the photo.
So overall, quite a lot going on under the hood, and all done almost instantaneously on your phone! To give PhotoScan a try, download the app on
Android or
iOS.


