Night Sight: Seeing in the Dark on Pixel Phones
November 14, 2018
Posted by Marc Levoy, Distinguished Engineer and Yael Pritch, Staff Software Engineer
Quick links
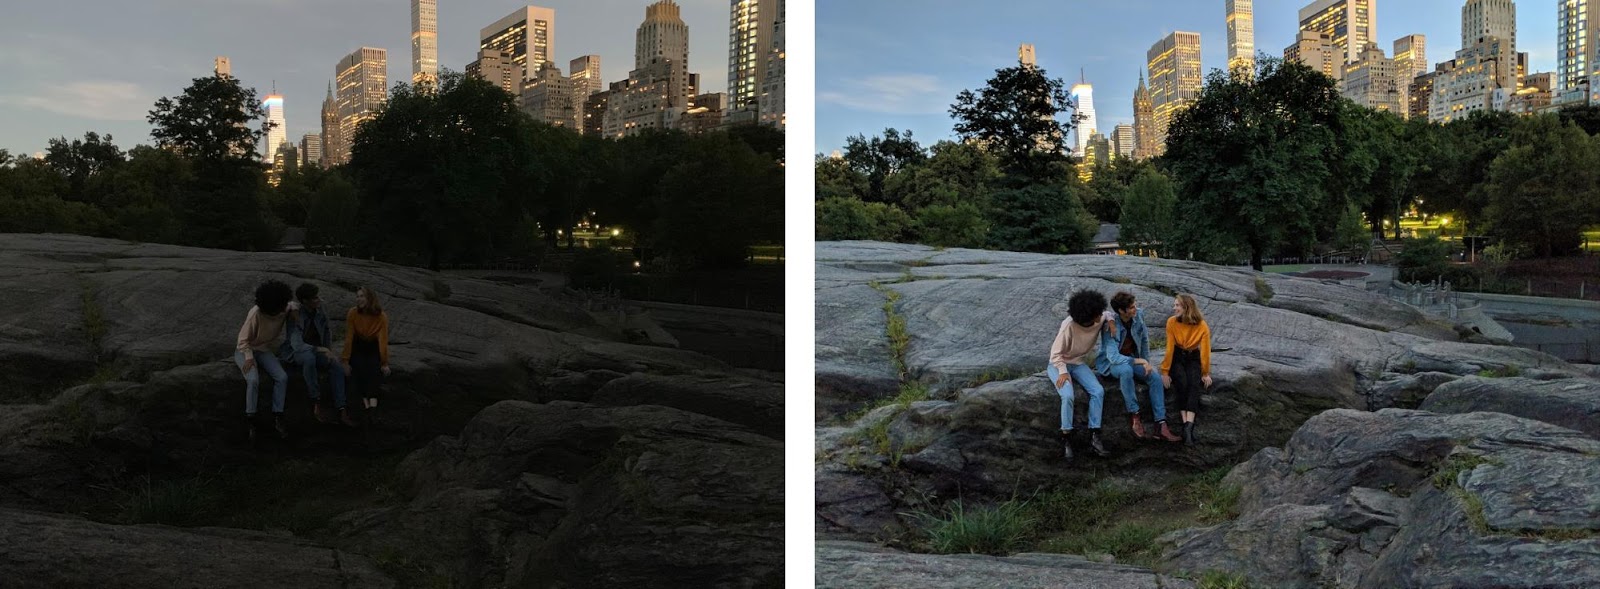
Night Sight is a new feature of the Pixel Camera app that lets you take sharp, clean photographs in very low light, even in light so dim you can't see much with your own eyes. It works on the main and selfie cameras of all three generations of Pixel phones, and does not require a tripod or flash. In this article we'll talk about why taking pictures in low light is challenging, and we'll discuss the computational photography and machine learning techniques, much of it built on top of HDR+, that make Night Sight work.
 |
| Left: iPhone XS (full resolution image here). Right: Pixel 3 Night Sight (full resolution image here). |
Anybody who has photographed a dimly lit scene will be familiar with image noise, which looks like random variations in brightness from pixel to pixel. For smartphone cameras, which have small lenses and sensors, a major source of noise is the natural variation of the number of photons entering the lens, called shot noise. Every camera suffers from it, and it would be present even if the sensor electronics were perfect. However, they are not, so a second source of noise are random errors introduced when converting the electronic charge resulting from light hitting each pixel to a number, called read noise. These and other sources of randomness contribute to the overall signal-to-noise ratio (SNR), a measure of how much the image stands out from these variations in brightness. Fortunately, SNR rises with the square root of exposure time (or faster), so taking a longer exposure produces a cleaner picture. But it’s hard to hold still long enough to take a good picture in dim light, and whatever you're photographing probably won't hold still either.
In 2014 we introduced HDR+, a computational photography technology that improves this situation by capturing a burst of frames, aligning the frames in software, and merging them together. The main purpose of HDR+ is to improve dynamic range, meaning the ability to photograph scenes that exhibit a wide range of brightnesses (like sunsets or backlit portraits). All generations of Pixel phones use HDR+. As it turns out, merging multiple pictures also reduces the impact of shot noise and read noise, so it improves SNR in dim lighting. To keep these photographs sharp even if your hand shakes and the subject moves, we use short exposures. We also reject pieces of frames for which we can't find a good alignment. This allows HDR+ to produce sharp images even while collecting more light.
How Dark is Dark?
But if capturing and merging multiple frames produces cleaner pictures in low light, why not use HDR+ to merge dozens of frames so we can effectively see in the dark? Well, let's begin by defining what we mean by "dark". When photographers talk about the light level of a scene, they often measure it in lux. Technically, lux is the amount of light arriving at a surface per unit area, measured in lumens per meter squared. To give you a feeling for different lux levels, here's a handy table:
Smartphone cameras that take a single picture begin to struggle at 30 lux. Phones that capture and merge several pictures (as HDR+ does) can do well down to 3 lux, but in dimmer scenes don’t perform well (more on that below), relying on using their flash. With Night Sight, our goal was to improve picture-taking in the regime between 3 lux and 0.3 lux, using a smartphone, a single shutter press, and no LED flash. To make this feature work well includes several key elements, the most important of which is to capture more photons.
Capturing the Data
While lengthening the exposure time of each frame increases SNR and leads to cleaner pictures, it unfortunately introduces two problems. First, the default picture-taking mode on Pixel phones uses a zero-shutter-lag (ZSL) protocol, which intrinsically limits exposure time. As soon as you open the camera app, it begins capturing image frames and storing them in a circular buffer that constantly erases old frames to make room for new ones. When you press the shutter button, the camera sends the most recent 9 or 15 frames to our HDR+ or Super Res Zoom software. This means you capture exactly the moment you want — hence the name zero-shutter-lag. However, since we're displaying these same images on the screen to help you aim the camera, HDR+ limits exposures to at most 66ms no matter how dim the scene is, allowing our viewfinder to keep up a display rate of at least 15 frames per second. For dimmer scenes where longer exposures are necessary, Night Sight uses positive-shutter-lag (PSL), which waits until after you press the shutter button before it starts capturing images. Using PSL means you need to hold still for a short time after pressing the shutter, but it allows the use of longer exposures, thereby improving SNR at much lower brightness levels.
The second problem with increasing per-frame exposure time is motion blur, which might be due to handshake or to moving objects in the scene. Optical image stabilization (OIS), which is present on Pixel 2 and 3, reduces handshake for moderate exposure times (up to about 1/8 second), but doesn’t help with longer exposures or with moving objects. To combat motion blur that OIS can’t fix, the Pixel 3’s default picture-taking mode uses “motion metering”, which consists of using optical flow to measure recent scene motion and choosing an exposure time that minimizes this blur. Pixel 1 and 2 don’t use motion metering in their default mode, but all three phones use the technique in Night Sight mode, increasing per-frame exposure time up to 333ms if there isn't much motion. For Pixel 1, which has no OIS, we increase exposure time less (for the selfie cameras, which also don't have OIS, we increase it even less). If the camera is being stabilized (held against a wall, or using a tripod, for example), the exposure of each frame is increased to as much as one second. In addition to varying per-frame exposure, we also vary the number of frames we capture, 6 if the phone is on a tripod and up to 15 if it is handheld. These frame limits prevent user fatigue (and the need for a cancel button). Thus, depending on which Pixel phone you have, camera selection, handshake, scene motion and scene brightness, Night Sight captures 15 frames of 1/15 second (or less) each, or 6 frames of 1 second each, or anything in between.1
Here’s a concrete example of using shorter per-frame exposures when we detect motion:
 |
| Left: Crop from a handheld Night Sight shot of the sky (full resolution image here). There was slight handshake, so Night Sight chose 333ms x 15 frames = 5.0 seconds of capture. Right: Tripod shot (full resolution image here). No handshake was detected, so Night Sight used 1.0 second x 6 frames = 6.0 seconds. The sky is cleaner (less noise), and you can see more stars. (Florian Kainz) |
The idea of averaging frames to reduce imaging noise is as old as digital imaging. In astrophotography it's called exposure stacking. While the technique itself is straightforward, the hard part is getting the alignment right when the camera is handheld. Our efforts in this area began with an app from 2010 called Synthcam. This app captured pictures continuously, aligned and merged them in real time at low resolution, and displayed the merged result, which steadily became cleaner as you watched.
Night Sight uses a similar principle, although at full sensor resolution and not in real time. On Pixel 1 and 2 we use HDR+'s merging algorithm, modified and re-tuned to strengthen its ability to detect and reject misaligned pieces of frames, even in very noisy scenes. On Pixel 3 we use Super Res Zoom, similarly re-tuned, whether you zoom or not. While the latter was developed for super-resolution, it also works to reduce noise, since it averages multiple images together. Super Res Zoom produces better results for some nighttime scenes than HDR+, but it requires the faster processor of the Pixel 3.
By the way, all of this happens on the phone in a few seconds. If you're quick about tapping on the icon that brings you to the filmstrip (wait until the capture is complete!), you can watch your picture "develop" as HDR+ or Super Res Zoom completes its work.
Other Challenges
Although the basic ideas described above sound simple, there are some gotchas when there isn't much light that proved challenging when developing Night Sight:
1. Auto white balancing (AWB) fails in low light.
Humans are good at color constancy — perceiving the colors of things correctly even under colored illumination (or when wearing sunglasses). But that process breaks down when we take a photograph under one kind of lighting and view it under different lighting; the photograph will look tinted to us. To correct for this perceptual effect, cameras adjust the colors of images to partially or completely compensate for the dominant color of the illumination (sometimes called color temperature), effectively shifting the colors in the image to make it seem as if the scene was illuminated by neutral (white) light. This process is called auto white balancing (AWB).
The problem is that white balancing is what mathematicians call an ill-posed problem. Is that snow really blue, as the camera recorded it? Or is it white snow illuminated by a blue sky? Probably the latter. This ambiguity makes white balancing hard. The AWB algorithm used in non-Night Sight modes is good, but in very dim or strongly colored lighting (think sodium vapor lamps), it’s hard to decide what color the illumination is.
To solve these problems, we developed a learning-based AWB algorithm, trained to discriminate between a well-white-balanced image and a poorly balanced one. When a captured image is poorly balanced, the algorithm can suggest how to shift its colors to make the illumination appear more neutral. Training this algorithm required photographing a diversity of scenes using Pixel phones, then hand-correcting their white balance while looking at the photo on a color-calibrated monitor. You can see how this algorithm works by comparing the same low-light scene captured using two ways using a Pixel 3:
 |
| Left: The white balancer in the Pixel’s default camera mode doesn't know how yellow the illumination was on this shack on the Vancouver waterfront (full resolution image here). Right: Our learning-based AWB algorithm does a better job (full resolution image here). (Marc Levoy) |
The goal of Night Sight is to make photographs of scenes so dark that you can't see them clearly with your own eyes — almost like a super-power! A related problem is that in very dim lighting humans stop seeing in color, because the cone cells in our retinas stop functioning, leaving only the rod cells, which can't distinguish different wavelengths of light. Scenes are still colorful at night; we just can't see their colors. We want Night Sight pictures to be colorful - that's part of the super-power, but another potential conflict. Finally, our rod cells have low spatial acuity, which is why things seem indistinct at night. We want Night Sight pictures to be sharp, with more detail than you can really see at night.
For example, if you put a DSLR camera on a tripod and take a very long exposure — several minutes, or stack several shorter exposures together — you can make nighttime look like daytime. Shadows will have details, and the scene will be colorful and sharp. Look at the photograph below, which was captured with a DSLR; it must be night, because you can see the stars, but the grass is green, the sky is blue, and the moon casts shadows from the trees that look like shadows cast by the sun. This is a nice effect, but it's not always what you want, and if you share the photograph with a friend, they'll be confused about when you captured it.
 |
| Yosemite valley at nighttime, Canon DSLR, 28mm f/4 lens, 3-minute exposure, ISO 100. It's nighttime, since you can see stars, but it looks like daytime (full resolution image here). (Jesse Levinson) |
 |
| A Philosopher Lecturing on the Orrery, by Joseph Wright of Derby, 1766 (image source: Wikidata). The artist uses pigments from black to white, but the scene depicted is evidently dark. How does he accomplish this? He increases contrast, surrounds the scene with darkness, and drops shadows to black, because we cannot see detail there. |
 |
| Pixel 3, 6-second Night Sight shot, with tripod (full resolution image here). (Alex Savu) |
Below 0.3 lux, autofocus begins to fail. If you can't find your keys on the floor, your smartphone can't focus either. To address this limitation we've added two manual focus buttons to Night Sight on Pixel 3 - the "Near" button focuses at about 4 feet, and the "Far" button focuses at about 12 feet. The latter is the hyperfocal distance of our lens, meaning that everything from half of that distance (6 feet) to infinity should be in focus. We’re also working to improve Night Sight’s ability to autofocus in low light. Below 0.3 lux you can still take amazing pictures with a smartphone, and even do astrophotography as this blog post demonstrates, but for that you'll need a tripod, manual focus, and a 3rd party or custom app written using Android's Camera2 API.
How far can we take this? Eventually one reaches a light level where read noise swamps the number of photons gathered by that pixel. There are other sources of noise, including dark current, which increases with exposure time and varies with temperature. To avoid this biologists know to cool their cameras well below zero (Fahrenheit) when imaging weakly fluorescent specimens — something we don’t recommend doing to your Pixel phone! Super-noisy images are also hard to align reliably. Even if you could solve all these problems, the wind blows, the trees sway, and the stars and clouds move. Ultra-long exposure photography is hard.
How to Get the Most out of Night Sight
Night Sight not only takes great pictures in low light; it's also fun to use, because it takes pictures where you can barely see anything. We pop up a “chip” on the screen when the scene is dark enough that you’ll get a better picture using Night Sight, but don't limit yourself to these cases. Just after sunset, or at concerts, or in the city, Night Sight takes clean (low-noise) shots, and makes them brighter than reality. This is a "look", which seems magical if done right. Here are some examples of Night Sight pictures, and some A/B comparisons, mostly taken by our coworkers. And here are some tips on using Night Sight:
- Night Sight can't operate in complete darkness, so pick a scene with some light falling on it.
- Soft, uniform lighting works better than harsh lighting, which creates dark shadows.
- To avoid lens flare artifacts, try to keep very bright light sources out of the field of view.
- To increase exposure, tap on various objects, then move the exposure slider. Tap again to disable.
- To decrease exposure, take the shot and darken later in Google’s Photos editor; it will be less noisy.
- If it’s so dark the camera can’t focus, tap on a high-contrast edge, or the edge of a light source.
- If this won’t work for your scene, use the Near (4 feet) or Far (12 feet) focus buttons (see below).
- To maximize image sharpness, brace your phone against a wall or tree, or prop it on a table or rock.
- Night Sight works for selfies too, as in the A/B album, with optional illumination from the screen itself.
 |
| Manual focus buttons (Pixel 3 only). |
Acknowledgements
Night Sight was a collaboration of several teams at Google. Key contributors to the project include: from the Gcam team Charles He, Nikhil Karnad, Orly Liba, David Jacobs, Tim Brooks, Michael Milne, Andrew Radin, Navin Sarma, Jon Barron, Yun-Ta Tsai, Jiawen Chen, Kiran Murthy, Tianfan Xue, Dillon Sharlet, Ryan Geiss, Sam Hasinoff and Alex Schiffhauer; from the Super Res Zoom team Bart Wronski, Peyman Milanfar and Ignacio Garcia Dorado; from the Google camera app team Gabriel Nava, Sushil Nath, Tim Smith , Justin Harrison, Isaac Reynolds and Michelle Chen.
1 By the way, the exposure time shown in Google Photos (if you press "i") is per-frame, not total time, which depends on the number of frames captured. You can get some idea of the number of frames by watching the animation while the camera is collecting light. Each tick around the circle is one captured frame.↩
2 For a wonderful analysis of these techniques, look at von Helmholtz, "On the relation of optics to painting" (1876).↩
-
Labels:
- Photography
Quick links
×
❮
❯


