Lens Blur in the new Google Camera app
April 16, 2014
Posted by Carlos Hernández, Software Engineer
Quick links
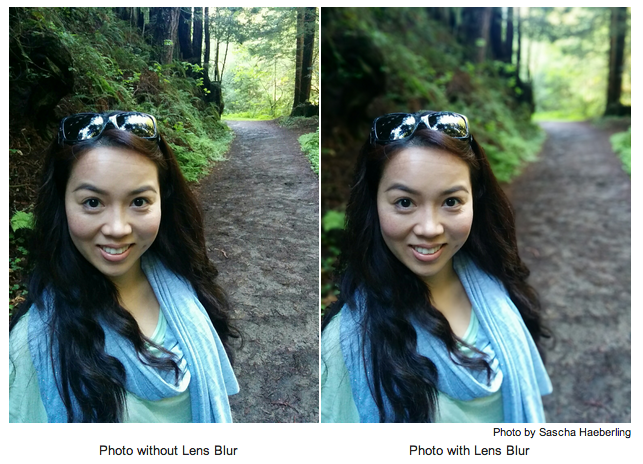
One of the biggest advantages of SLR cameras over camera phones is the ability to achieve shallow depth of field and bokeh effects. Shallow depth of field makes the object of interest "pop" by bringing the foreground into focus and de-emphasizing the background. Achieving this optical effect has traditionally required a big lens and aperture, and therefore hasn’t been possible using the camera on your mobile phone or tablet.
That all changes with Lens Blur, a new mode in the Google Camera app. It lets you take a photo with a shallow depth of field using just your Android phone or tablet. Unlike a regular photo, Lens Blur lets you change the point or level of focus after the photo is taken. You can choose to make any object come into focus simply by tapping on it in the image. By changing the depth-of-field slider, you can simulate different aperture sizes, to achieve bokeh effects ranging from subtle to surreal (e.g., tilt-shift). The new image is rendered instantly, allowing you to see your changes in real time.
Lens Blur replaces the need for a large optical system with algorithms that simulate a larger lens and aperture. Instead of capturing a single photo, you move the camera in an upward sweep to capture a whole series of frames. From these photos, Lens Blur uses computer vision algorithms to create a 3D model of the world, estimating the depth (distance) to every point in the scene. Here’s an example -- on the left is a raw input photo, in the middle is a “depth map” where darker things are close and lighter things are far away, and on the right is the result blurred by distance:
Here’s how we do it. First, we pick out visual features in the scene and track them over time, across the series of images. Using computer vision algorithms known as Structure-from-Motion (SfM) and bundle adjustment, we compute the camera’s 3D position and orientation and the 3D positions of all those image features throughout the series.
Once we’ve got the 3D pose of each photo, we compute the depth of each pixel in the reference photo using Multi-View Stereo (MVS) algorithms. MVS works the way human stereo vision does: given the location of the same object in two different images, we can triangulate the 3D position of the object and compute the distance to it. How do we figure out which pixel in one image corresponds to a pixel in another image? MVS measures how similar they are -- on mobile devices, one particularly simple and efficient way is computing the Sum of Absolute Differences (SAD) of the RGB colors of the two pixels.
Now it’s an optimization problem: we try to build a depth map where all the corresponding pixels are most similar to each other. But that’s typically not a well-posed optimization problem -- you can get the same similarity score for different depth maps. To address this ambiguity, the optimization also incorporates assumptions about the 3D geometry of a scene, called a "prior,” that favors reasonable solutions. For example, you can often assume two pixels near each other are at a similar depth. Finally, we use Markov Random Field inference methods to solve the optimization problem.
Having computed the depth map, we can re-render the photo, blurring pixels by differing amounts depending on the pixel’s depth, aperture and location relative to the focal plane. The focal plane determines which pixels to blur, with the amount of blur increasing proportionally with the distance of each pixel to that focal plane. This is all achieved by simulating a physical lens using the thin lens approximation.
The algorithms used to create the 3D photo run entirely on the mobile device, and are closely related to the computer vision algorithms used in 3D mapping features like Google Maps Photo Tours and Google Earth. We hope you have fun with your bokeh experiments!
Quick links
×
❮
❯


